DIY Hair Tie & Bobby Pin Organiser: Tutorial

DIY Hair Tie & Bobby Pin Organiser: Tutorial

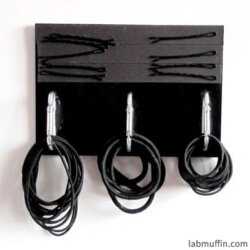
Like most people with long hair, I have a million hair ties and bobby pins that end up strewn all over the bathroom. I’ve tried organising them with jars and hooks, but it never seems to stick.

I recently saw two life hacks for how to keep everything neat: a magnetic strip for bobby pins, and carabiner clips for holding hair ties. Why not combine the two into a not-entirely-ugly organiser and stick it to the wall? Yeah, that’s what I did. I’m a low-key genius.

DIY Hair Tie & Bobby Pin Organiser: Tutorial

To put hair ties into the holder, you can just press the hair tie in and it’ll click into place. Taking the hair ties out is slightly more effort but much less than scrambling around trying to dig one out of who-knows-where.

DIY Hair Tie Organiser

You want one too? You’re in luck, I have instructions!

DIY Hair Tie Organiser

What you need

  • A5 piece of perspex (Amazon, eBay): You can go larger or smaller depending on your hair accessory holding requirements, but this works great for me. Shiny works best with the suction cups. I went for opaque because I didn’t want to see the cups, and black because everything matches it.
  • Double sided suction cups (Amazon, eBay): This is what I’m using to fix the perspex to my wall. I like this because it doesn’t leave any marks on the wall or the perspex, but unfortunately the quality of these is pretty variable so in the pack of 10 I received I had 2 deformed ones. I also considered using a double-sided pad covered in tiny suction cups but it didn’t work at all.
  • Adhesive magnetic strips (Amazon, eBay): I got the 15 mm wide strip with adhesive already attached.
  • Carabiners (Amazon, eBay): I used carabiners that were around 4 cm (1.5 inches) long. I bought these specifically because the non-clip side was completely flat, so it would have a larger contact area when I stuck it to the perspex. The number will depend on the size of your perspex but I found that placing them around 6 cm (2.5 inches) apart was perfect.
  • Gorilla glue (Amazon, eBay): I’m sure other glues will work, but this is what the guy at the hardware store recommended and he knows more than me. I suspect that a slightly less brittle glue might actually be better. (Edit: I’ve since replaced it with silicone glue and yes, it does work better!)

I bought everything except the glue off eBay, but it took weeks to get to me. If you aren’t rushed, at current eBay prices it works out to be less than $15 AUD. Bargain!

Read more

Why DIY Sunscreen Doesn’t Work

Video: Why DIY Sunscreen Doesn't Work

Video: Why DIY Sunscreen Doesn't Work

Here’s a new video on why DIY sunscreen doesn’t work. It’s a much more detailed version of my post on DIY sunscreen from a while ago. It’s a topic that’s quite important to me, since it’s one of those cases where having the wrong information can cause serious harm!

This video has been a bit delayed due to the rest of my life getting a bit hectic, but I managed to get it out before the Northern Hemisphere summer finished, so go me…

I bought a lapel microphone and some new editing software, so everything is a bit more polished I hope! Check it out here.

Extra notes and references

Since I know there are a lot of nerds out there who like references and extra information, here are some of the sources for specific things I mention in the video (I got lazy with my citation style, sorry):

Skin cancer stats are sourced from the Cancer Council Australia and the Skin Cancer Foundation, who list the original sources at the bottom of their respective sites.

SPF testing guidelines: FDA (USA), TGA (Australia), EC (EU).

Dangers of UVA: Blog Post: Why You Should Protect Yourself From UVA

More info on sunscreen formulation

Sunscreens are very unlikely to cause endocrine disruption in practice: Journal of the American Academy of Dermatology (open access – quote: “Mathematic modeling indicated that it would take 277 years using a sunscreen containing 6% oxybenzone used at 2 mg/cm2 (the dose recommended for sun-protection factor [SPF] testing by the FDA) or 1 mg/cm2 (reported real-life use) to achieve the systemic levels of oxybenzone achieved in the study in rats”), Australasian Journal of Dermatology (looks at other filters apart from oxybenzone)

Nanoparticles in sunscreens are safe: TGA Literature Review (very comprehensive)

More (open access!) papers on zinc oxide: Nanotechnology Science and Applications, Science and Technology of Advanced Materials

People stay in the sun for longer when wearing sunscreen: JID paper (open access)

Reporting illegal medicines: FDA report form, TGA report form

Do oils increase UV penetration?

This is a topic that I thought deserved a longer write-up.

Read more

How to Use Glycerin for DIY Beauty

How to Use Glycerin for DIY Beauty

Glycerin’s in a lot of skincare products because it’s an awesome humectant moisturiser that can grab onto water and hold it to the skin. It’s also very cheap to buy at the supermarket ($9.35 for 200 mL at Coles in Australia, $6-7 for 473 mL/16 fl. oz on iHerb or Amazon).

Glycerin for DIY Beauty

What can you do with it? Here are some (low-effort) suggestions:

  • Make a moisturising nail polish remover
  • Make a hydrating toner
  • Put glycerin in DIY serums
  • Use glycerin to boost your moisturisers
  • Add glycerin to clay masks to stop dehydration
  • Hair treatment
  • DIY eyeshadow foiling medium

Make a moisturising nail polish remover

diy nail polish remover

Most nail polish removers have this issue where they either work very well but dessicate your cuticles, or they’re kind to your skin but take forever to dissolve nail polish. This acetone-glycerin mix blends the best of both worlds: acetone will dissolve your nail polish like no one’s business, and glycerin will stop it from stripping away moisture. Here’s my recipe for a gentle but effective DIY glycerin/acetone remover.

Related Post: DIY Gentle (but effective) glycerin nail polish remover

nail polish remover
nail polish remover

Make a hydrating toner

Glycerin is found in tons of toners thanks to its ability to hold onto water, which can revive dehydrated skin. Plain water will normally dehydrate your skin because it makes your skin more permeable, then when it evaporates it makes your skin drier than before. Adding glycerin stops this from happening.

The only problem with this is that glycerin/water combos need preservatives if you leave them for more than a few days, because glycerin is very good food for bacteria (if it’s above ~50% glycerin content it’s a bit like honey so bacteria can’t survive…but it’s also sticky and thick like honey so it isn’t pleasant to have on your skin all day).

Related Post: Humectant Waters and Sprays: A Quick Fix for Dehydrated Skin


Read more

Depotting Etude House Proof 10 Eye Primer

empty-etude-house-proof-primer-IMG_6488

There’s bad packaging, and then there’s BAD packaging. Etude House Proof 10 Eye Primer is a fantastic product (better than Urban Decay’s Primer Potion in my opinion, and cheaper too, about $8 on eBay!), but the packaging is ridiculous. It’s a curvy bottle with a doe-foot applicator, much like a squat version of the Urban Decay Primer Potion bottle, which is notorious for hiding product in the corners. This bottle manages to be worse. The applicator only reaches about 1/3 of the product, and the bottle looks like it could be opaque pink when you can’t reach any more primer, but that’s actually the product you can see.

proof-10-primer-IMG_6481

From some other blogs, I’ve seen that cutting the bottle open lets you get into the remaining 67%, so I got out my equipment and started sawing away. The bottle’s pretty robust, so it took a lot of elbow grease…

primer-depotting-equipment-etude-house-proof-IMG_6484

Read more

DIY Subscription Box Drawers

diy-subscription-box-drawers

If like me, you’ve been collecting subscription boxes and have finally run out of random uses for them, this might work for you too – I’ve decided to stick together a bunch of my Violet Boxes to make a chest of drawers. If your boxes are also this slide-out type, this is a super easy way to reuse them! If …

Read more

How to choose a skincare mask

clay-masks

There are a lot of masks out there – which one should you use to boost your skincare routine into hyperdrive? Let me help!

What is a mask?

A mask is a treatment that you put on your face for an extended period of time (between 10 minutes and 10 hours). You’re not meant to be seen in public while it’s on. The effects of a good mask will last around 1-3 days.

There are a bunch of different types of masks, good for different purposes. There’s a bit of crossover, especially if you’re mixing the mask yourself, but these are the basic categories:

Clay masks

Clay masks have clay as their main ingredient, and are helpful for sucking oil out of your pores, along with any random gunk in the oil. There are a range of clays with slightly different textures, but since all sorts of ingredients (oils, humectants like honey, etc.) can be mixed into a clay mask, it’s hard to say what effect a particular clay mask will have without trying it (though we can safely say that none of them will detox your body).

Kaolin clays are less absorbent than bentonite, so kaolin-based masks (usually white or pink in colour) are generally better for dry and sensitive skin, while bentonite masks (usually green in colour) are recommended for oily skin (I’m using handwavy language on purpose, because there is a LOT of variation – look up reviews of that specific mask before you buy).

How to use: You can apply a clay mask with your fingers (my preferred method) or a brush (feels posher, but requires more clean-up). Wait 5-30 min depending on your skin’s tolerance, then wash off (you may need to use a cloth to soak it off – I find that sticking my face under the shower head for 5 seconds helps tremendously). You don’t need to wait for it to dry before removing, but letting it dry will result in more oil absorption (but also more irritation potential).

clay-masks

Examples: Aztec Secret Indian Healing Clay is pure powdered calcium bentonite clay that you can mix into a mask yourself. If you mix it with an acidic substance, you’ll end up with a more skin-friendly pH and a very absorbent mask (here are some recipes for mixing bentonite with non-stinky citric acid and for mixing with slightly stinky ACV). You can make it less absorbent by adding humectants and oils. I’ve also got The Cosmetic Kitchen Raw Chocolate Clay Mask, which consists of pre-mixed Australian pink clay and raw cacao powder (antioxidant).

If you don’t want to go through the fuss of mixing, Queen Helene Mint Julep Masque is a popular option which contains both kaolin and bentonite, but I find that the anti-acne sulfur in it smells very unpleasant (lots of other people disagree). Paula’s Choice Skin Balancing Oil Absorbing Mask* is another example, but I found it quite itchy. Moreish Emergence Clay Mask* is a premade kaolin clay mask that’s super gentle, with lots of humectants and oils thrown in.

Hydrating masks

Hydrating masks are a pretty broad category – there are oil-based masks which soften your skin, there are humectant-based masks which help water bind and absorb. I’m lumping them together because most oil-based masks have some humectants in them. These masks aim to leave your skin smooth and plump.

Read more

Oils for Oil Cleansing – Review

oil-cleansing

oil-cleansing

Since I posted the Beginner’s Guide to Oil Cleansing, a few people have asked me which oils I’ve tried for oil cleansing and what I thought of them, so here’s a quick rundown of my experience. A few things to note:

  • Your mileage may vary. Skincare is individual, what works for me may not work for you.
  • Oils are natural extracts without a definitive, set composition – one brand will not be the same as another, and even different batches from the same brand can differ. The more refined an oil, the more consistent it’ll be, but the less antioxidants/vitamins/non-triglyceride stuff it’ll contain.
  • Oils go off! Especially oils with a high linoleic acid, which unfortunately is also the type of oil that works best for my skin. If your oil smells different, it might be time to chuck it out.
  • Oils sold for cooking and oils sold for skincare may have different compositions – cooking oils are sometimes enriched in oleic acid compared to their skincare counterparts, and often are more processed and will contain less antioxidants/vitamins/non-triglyceride stuff.

With that out of the way, here are all the oils I’ve tried so far:

Olive oil

Product used: Cobram Estate Extra Virgin Olive Oil ($5.99 for 375 mL = $0.016 per mL)

Olive oil is high in oleic acid, which gives it a thick, rich feel and has a higher chance of comedogenicity (causing pimples). There are mixed reports about whether olive oil is helpful or hurtful in skincare, which I would bet is partly because of the crazy amount of contaminated olive oil out there (from that last article, apparently Italy sells 3 times as much olive oil as it produces, and only 4% of exported Italian olive oil is pure).

This was the first oil I tried for oil cleansing. Cobram Estate seems to be legit, so I wasn’t too worried about the contamination issue. I did find it thicker and stickier than I liked though, so it tended to hang around on my shower tiles, plus it smelled strongly of olive oil which made me hungry.

Verdict: Might be good for dry skin, but do your research and beware of widespread contamination.

Sunflower oil

Product used: Coop Sunflower Oil (Swiss supermarket brand) – similar to Coles Sunflower Oil ($2.70 for 750 mL = $0.0036 per mL)

I ran out of make-up remover in Switzerland and my skin was feeling dry, so I grabbed the oil from the kitchen and tried cleansing with it. My skin ended up looking better than ever! I put it down to the high linoleic acid content. It’s light, less likely to clog pores and might help reduce acne, though I can’t pretend I have anything but unreliable anecdotal evidence on that front. It was the oil that really got me back into oil cleansing, and I’m sure I’ll come back to it… after I’ve tried all the other oils! It was mildly scented.

Verdict: Fantastic basic oil, suitable for most skin. No complaints! Be aware that sunflower oil for cooking may be “high oleic”, which will work differently.

Read more

How to Mix an Aztec Clay Mask Without the Smell

aztec-clay-citric-acid-1

aztec-clay-citric-acid-1

Aztec Secret Indian Healing Clay makes a great mask, but it’s alkaline so you need to mix it with apple cider vinegar to bring the clay to a skin-friendly pH. But then you slap it on your face and try to relax, but you can’t because all you can smell is vinegar. What can you do?

I was stuck with that conundrum, when I realised that there’s a safe, non-stinky acid you can buy at the supermarket: citric acid! Citric acid is used for baking, jams and making bath bombs. It comes as sugar-like crystals, and only costs a few dollars. It smells extremely mild, so you can do your mask and feel pampered and not like you’ve stuck your head into sauerkraut. It’s a win all round!

(Technically, citric acid is also an alpha and beta hydroxy acid and has nice effects on skin, but it doesn’t seem to be as effective as glycolic or lactic acids, and there’s only a tiny chance that it’ll do anything with the concentration, pH and application time we’re using.)

Recipe

I picked myself up a shaker of citric acid, did some calculations (skip to the bottom of the post for those) and played around with proportions. A ratio of 1:8 acid to clay worked well – that is, 1/8 tsp acid for 1 tsp of clay. I added enough water to get the consistency I wanted (about 1 tsp), and the final pH ended up as ~5. This recipe gives a pretty thin mask – double it if you prefer a thick layer.

I also tried 1:4 acid to clay (1/4 tsp acid mixed with 1 tsp clay), which gave a pH of 4-5. While it was OK going on, the mask stung a little by the time it was dry, though it didn’t leave the redness I usually get with 1:1 clay/ACV. My skin also looked particularly nice afterwards. If your skin is pretty resilient to acids (e.g. you’ve used chemical exfoliants a lot), you could perhaps cautiously try this stronger version out.

If you decide to try these recipes, please be cautious the first time you do it – either test the pH with strips, or patch test it behind your ear, or at least be ready to jump into the shower and wash it off your face immediately if you feel an unusual amount of irritation. It’s quite likely that our measuring methods and our ingredients are a bit different (different degrees of packed down, levelling scoops etc).

Read more