I had purple and mauve hair for about six months, but the purple I had really sunk and it’s way in, and I couldn’t get it to the warm, peachy color that I really wanted. But I was a bit scared of just bleaching it because I had to bleach it twice the first time to get it to get to purple, and so it was already pretty damaged. So here’s how I did it.
The video is here, keep scrolling for the text version….
Why does hair stain?
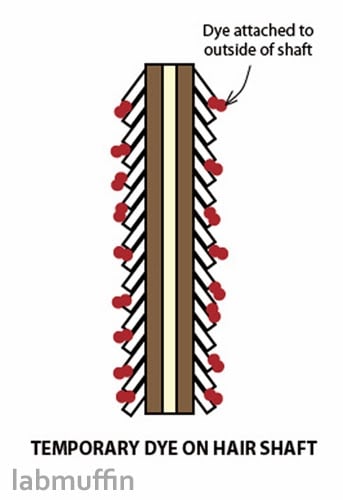
The dyes that I’ve been using are called direct dyes. These have big pigment molecules that stick to the outside of the hair shaft. Usually, they’ll wash away eventually, but sometimes the molecules absorb a bit too deep into the hair for it to wash out – which is what happened to me.
Related Post: How Do Different Types of Hair Dye Work? The Science
What’s Wrong With Bleach?
The standard way of fading stained hair is to use bleach. Bleach breaks up the dye molecules into smaller fragments. This stops them from absorbing coloured light, which stops them from appearing coloured.
For example, I suspect my stained hair was caused by the dye Basic Violet 2. Its molecules absorb light in the yellow and green regions. When white light hits it, the yellow and the green get absorbed, and the rest of the colour (mostly red and purple) bounces off. Since that’s what hits your eye, it appears reddish-purple.

When bleach is applied, it breaks up the dye molecule into smaller pieces so it stops absorbing light in the visible colour range. This means the dye stops appearing coloured.
The problem? Bleach damages your hair in a bunch of different ways. Bleach is an oxidizing agent, and causes a bunch of different types of damage collectively known as oxidative damage.
Firstly, it breaks up disulfide bridges in your hair. This makes your hair a lot weaker so it breaks more easily, especially in water. This is why bleached hair turns super stretchy and floppy when wet.
Bleach also removes some of the fatty acids that are normally bound to the outside of your hair (the F-layer). This makes hair become less soft and silky. It also tangles more easily, and doesn’t hold on to hair conditioner as well. This also makes your hair more hydrophilic (water-loving), so it’ll swell up more when wet and take longer to dry.
Bleach also breaks up proteins in your hair so they’re washed away more easily. This adds to the weakening effect, plus the cuticle on the outside of the hair chips away and becomes dull and rough.
But one of the biggest problems is despite all this damage, it still might not completely work! It might not break the dye molecules enough, and you’ll end up with larger fragments can still absorb coloured light. But now the colours are different, and you can end up with weird off-colour hair.
Related Post:Busting Hair Conditioner Myths: Build-Up, Silicones, Weighing Hair Down etc.
Katie’s Direct Dye Fading Treatment
I decided to try a method from the Hair Crazy website called Katie’s Direct Dye Fading Treatment. I only did half my hair in the video so you can see the difference.
Prep Work
Before using the treatment, you should try to clarify your hair and repair it as much as possible. I used a clarifying shampoo, applied Olaplex to try to repair the bonds, and avoided silicones in my hair products for a few days.
Related Post: How Does Olaplex Hair Treatment Work?
Step 1: Coconut Oil
The first step is to apply coconut oil to dry hair and then wait for two hours. It turns out applying liquid coconut oil to hair is really difficult. (If anyone knows how to do this without it dripping all over the floor, please let me know – this was a pain to clean!)
The logic behind this is that coconut oil has saturated fatty acids, which means that its structure is skinny enough to absorb between the cuticle scales of your hair. Applying it for a prolonged period hopefully means it can dissolve some of the dye molecules, and get them out of the hair without any damage.
Step 2: Bleach
The next step is to make a mix of 15% ammonia-free bleach powder (I used Hi Lift Ammonia Free Bleach Blue Powder), 80% clarifying shampoo, and 5% oils. Then you apply the gritty mixture over your oily hair (don’t rinse the oil out), and work it through the hair like you’re scrubbing it for about 5 minutes.
In theory, the way this works:
- The high (alkaline) pH loosens the cuticle structure and allows the surfactants, oils and bleach to access the inside of the hair
- The bleach destroys dye molecules
- The shampoo surfactants and oils dissolve the dye molecules and dye molecule fragments, so they can be carried out of the hair
There isn’t enough water in the shampoo to dissolve all of the bleach powder, so the bleach concentration isn’t actually 15% (the persulfate in the bleach needs to dissolve before it can work as bleach). The gritty powder particles also physically scrub dye molecules off the outside of the hair, but also cause a bit of damage… which does also make the dye easier to access! But there’s an obvious trade-off.
Related Post: My Asian Hair Bleaching Experience
Step 3: Heat
After scrubbing, you put on a plastic shower cap and warm your hair with a hairdryer for five to ten minutes. Since I only did half my hair, I used cling wrap for this part.
This helps the product soak into the hair deeper. The heat decreases the surface tension of everything involved – hair and product – making it more fluid so all the components mix better.
Step 4: Rinse
Finally, you shampoo everything out using hot water. Again, heat helps everything mix better – including helping the dye molecules mix in with the running water!
Results
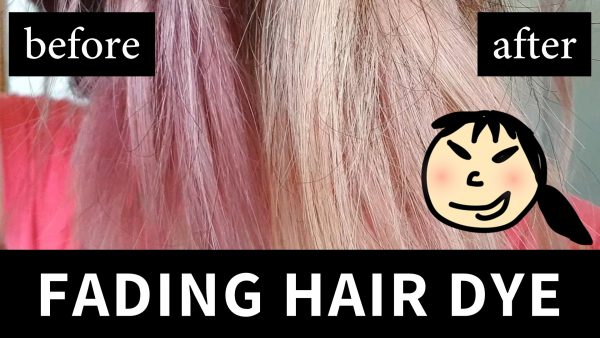
My hair was originally stained a pale purplish colour – even with repeated shampooing and no dyeing, it stayed this colour. It was actually quite a pretty colour, but I needed a change! It’s the colour on the left:
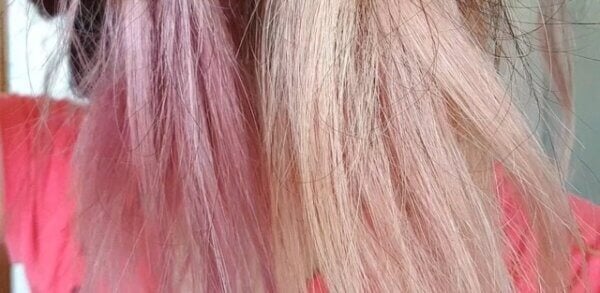
After the treatment and air drying, my hair was a lot more yellow and faded (the colour on the right). I was pretty impressed by the difference! And since I was planning to dye my hair pinkish-peach, the yellow wasn’t a problem.
The hair was noticeably rougher after the treatment, but didn’t feel more fragile. Some of this would be surface damage to the cuticle, but some might just be removal of oils and conditioning ingredients from the surface, which should reverse after some intense conditioning treatments.
For further fading you can repeat the treatment, which I did before dyeing my hair to peach.


I was just looking for a way to remove Pravana Vivids and your email popped in my inbox. Thank you for sharing!
Aaw! I’m gonna miss the purple hair. The pink color looks good, too, though.