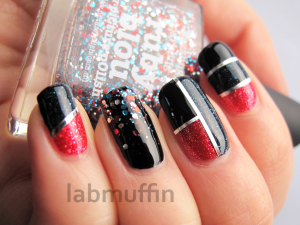
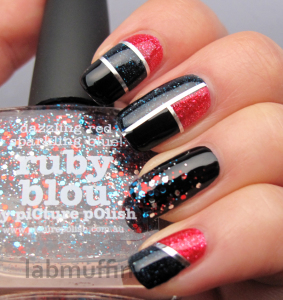
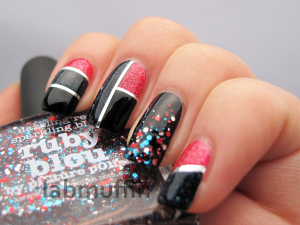
I can’t believe it’s been a year since the last piCture pOlish Blog Fest! This year, no new shades are being launched but we’ve been asked to create a nail art tutorial featuring piCture pOlishes. I’ve used Hope, Dorothy and Ruby Blou to make an easy and bold striping tape design:
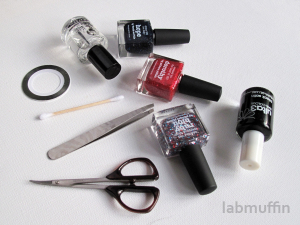
What I used:
Block nails:
– Striping tape (silver, from eBay)
– Polish: piCture pOlish Hope and Dorothy, and ulta3 Black Satin
– Tweezers
– Small scissors
– Top coat (Seche Vite)
Glitter gradient accent:
– Base colour (ulta3 Black Satin)
– Glitter in a clear base (piCture pOlish Ruby Blou)
– Cotton bud aka Q-tip
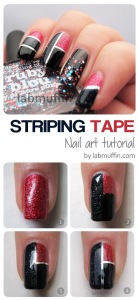
1. Paint on your base colour (I used piCture pOlish Dorothy, a red microglitter shade)
2. Roughly paint on the other blocks of colour. I used the bottle brushes of piCture pOlish Hope and ulta3 Black Satin to do this, but if it’s too fiddly, you can use a thin nail art brush. It doesn’t have to be perfectly straight, because the edges will be covered in striping tape. If you’re patient, you can block off the colours with regular tape. If it’s uneven, put on some smoothing top coat at this point to even it out.
3. Wait for the polish to dry. Cut the striping tape just a tad longer than you need. Using the tweezers, position the tape where you want, then press it down gently with the tweezers. Trim the excess with the scissors.
4. Cover with top coat and you’re done!
For the glitter gradient accent, I used the technique from my cotton bud glitter gradient tutorial.
I really liked this manicure – it’s bold but effective, and pretty easy to do! Check out all the other Blog Fest manis:
piCture pOlish can be purchased here, and they have international stockists too!
The polishes were provided for the purposes of Blog Fest 2013, which did not affect my opinion. For more information, see Disclosure Policy.



Stunning!!! Ruby blou is such a gorgeous shade!
xx
http://ms-jelena.blogspot.com
Thanks! I do love the mix of colours in it 🙂
Gorgeous combo!! Your tape work is amazing I can never get it to look that good! 😀
Thanks Chantelle! I was struggling until I realised I could use tweezers, then it got way easier.
Man … Dorothy looks striking against black *makes note to try*
I think it’s too pink to be my colour, but I thought of you when I was applying it 🙂
Really stunning, love this look!
Thanks Theresa!
This is lovely! I will definitely have to invest in some striping tape!
It’s a great investment – very cheap 🙂
I love this mani! It’s really striking and very ‘mod’. 🙂
Thanks, I’ve been meaning to try striping tape for ages but I’ve been too lazy, it’s surprisingly easy!
Very modern – perfect tape mani and glitter gradient!
Thank you Ann – I love how tape manis always look modern 🙂
Absolutely love this! xx
Thanks Jasmine!
Yeap! I love how bold, edgy and dazzling with mysterious vibes this mani gives! Lots of character, I say! Very beautiful! I love how well the colours compliments each other! Especially ruby blou!
Such an apt description, thank you very much!
This is a lovely combination of colours and patterns love, really pretty x
Thanks Polly!
This is really nice…striping tape and color blocking…so classic!
Thank you. Can’t go wrong with a nice colour block!
i love this!! really pretty 🙂
Thanks!
Thanks for the great tutorial! 🙂
Glad you enjoyed it – it’s pretty basic but the tweezers really helped!
Gorgeous, this combo is so pretty <3
Thanks! piCture pOlish chose some lovely colours for me 🙂
you pulled off some challenging colors!!! love it!
Thanks! I think they work really well with the silver tape 🙂
Super cute Michelle! Love what you did 🙂
Thanks Jas! All us Aussie girls did great 🙂
pretty!
It is! 🙂 Ruby Blou is so photogenic on the black background.
This looks beautiful! I love the color blocking!
Thank you, colour blocking is one of my favourite types of design! 🙂
Okay, that’s it, Hope is going on the wishlist now! I love this look, tape designs never get old 🙂
Hope is really pretty, I love the holo flakes that piCture pOlish uses!
Ahhhh! I love this mani. It’s sooooo beautiful. My favorite is the ruby
Is it available in the states? I’m on a glitter polish craze right now and have been buying up a million to compensate for my lack of glitters lol. Xoxo,
Haylee
Makeupandmasala.blogspot.com
Yes it is – check out the international stockist page! https://www.picturepolish.com.au/index.php?route=information/information&information_id=8
Really lovely manicure 🙂
I love the color combination 🙂
I just had to subscribe 😀
hugs
xx
These make such a great colour block & you made a really neat job of it with the bottle brushes. I got Ruby Blou too and even though I rarely use those kinds of glitters I think it’s sooo pretty – especially over black.
It really amazing tutorial and awesome nail art collection. Love all those colors and collection.
Thanks
Cindy
gel polish kit