Part 4 of the Nail Blogger Secrets series looks at the most enticing, yet most frustrating of polish genres: glitter. How do you get it, how do you use it, and how do you get rid of it?
There’s a special moment when a polish-lovin’ nail fiend first discovers glitter. Not fine, sprinkly glitter top coat (though those deserve love too), but chunky glitterbombs. For some ladies it’s an OPI or a random dollar-store cheapie. For others, it’s straight into the crazy-awesome indie world, with jelly bases, creme bases, matte and neon glitters.
For me, it was three years ago, and there was only one big name in glitter – Lynnderella. I was casually browsing some OPI swatches when I stumbled across my first Lynnderella photo. It blew me away. What was Lynnderella, and how could I get my hands on one?? (Even back then it involved knowing people and submitting wish lists, so I didn’t have my hopes up.)
 |
| Obligatory glitter porn. Clockwise from top left: Emily de Molly and Hello Darling, Loki’s Lacquer, Pretty Serious, Sayuri |
Fast forward three years, and you can’t Google nail swatches without bumping into a chunky glitter or two – most big name commercial brands have a few indie-style glitters, and there are more indie brands than you can shake a clean-up brush at. But before you dive in and hunt down all the shinies, there are a few things you need to know…
Where do I buy this mythical glitter?
Nowadays, it’s not too difficult to buy glitterbomb polishes. Back when I first started blogging, the only mainstream full coverage glitter was OPI Rainbow Connection, and the only way to get your hands on Lynnderella was through a complicated wishlist system. Now, it’s pretty easy – most mainstream brands have a few chunky glitters, there are quite a few indie distributors, and glitter polish is all over Etsy. While the vast majority of indie polish makers know the rules of the game and offer quality products and excellent customer service, like in any other field, there are a few who are unscrupulous – use your Google-fu before you open your wallet.
Indie distributors
Many of these ship worldwide, but postage will obviously be less if you pick one close to you.
Femme Fatale Cosmetics (Australia)
Harlow and Co (Canada)
Ninja Polish (US)
Llarowe (US)
Color4Nails (US) Rainbow Connection (UK)
Sally Magpies (UK)
Norway Nails (Europe)
Edgy Polish (Europe)
Le Doux Nuage (Europe)
Pshiiit Boutique (Europe)
Mei Mei’s Signatures (Singapore)
BeautySoFly (Singapore)
Individual stores
Lacquerheads of Oz have a frequently updated list of Aussie indies, their social media links and stores and stockists. xoxo, Jen and Things I Love At the Moment both have super comprehensive, US-centric lists of individual brands’ stores.
Many mainstream brands have indie-like chunky glitters these days. A few notable commercial brands who do particularly interesting glitters are Australis, Face of Australia, Claire’s and Sportsgirl.
Glitter application isn’t normal polish application
You can get away with applying some glitter polishes like normal polish (stroke it on, in a few strokes). For the majority of chunky glitters though, you should be dabbing the glitter on, otherwise the glitter will just drag and mess up the layers underneath.
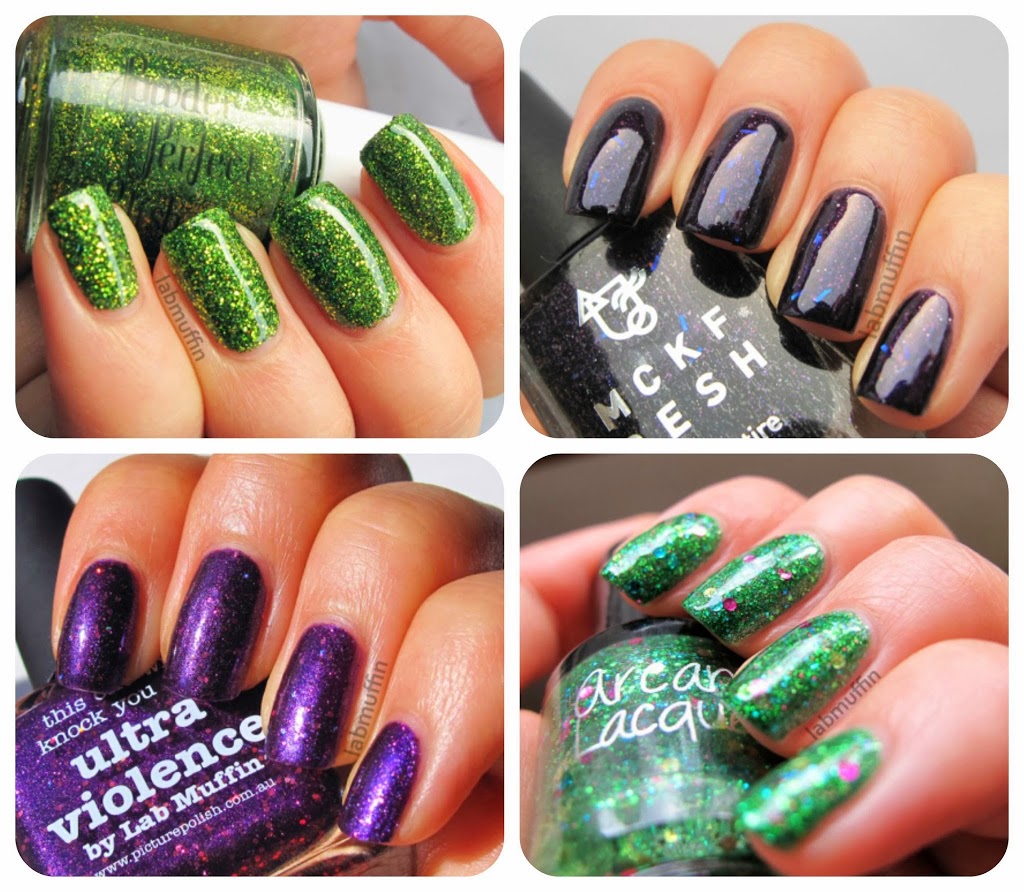 |
| More unnecessary, yet oh-so-necessary glitter porn. Clockwise from top left: Powder Perfect, Mckfresh, Arcane, Picture Polish |
For video demonstrations of different ways of dabbing glitter on for good coverage, check out these posts by two experienced Aussie indie lovers – More Nail Polish (at the bottom of the post) and The Reluctant Femme (skip to around 3:00).
Frequently, glitter polishes will also need undies. Many glitter polishes are designed to be worn over another polish that’s more opaque – sparse glitters in clear bases, in particular, aren’t meant to be worn alone on the nail (I’ve committed this nail faux pas back in my naive high school days – don’t do it! It’s like seeing a red G-string through too-tight white pants). Sometimes tinted bases are quite sheer to allow you to build depth without having the glitter in the lower layers disappear – opinion is divided on whether visible nail line is a no-no in this case. Either way, don’t be afraid to layer and test out new combos!
Another issue is that glitters often dry bumpy (which isn’t really such a surprise, since glitter is solid). Sometimes this is fun, but if you want a smooth, glassy finish, you need a special top coat, commonly known as a glitter food. Common top coats used for smoothing out your glitter polish into a buttery smooth, skateable surface are Essence Gel-Look Top Coat, Nail Pattern Boldness Glitter Food, and old gloopy Seche Vite. Since the glitter food layer will usually be thick to fill in the holes in your glitter layer, you’ll probably want to use a quick-dry top coat over it (see the first part of the series for more about quick dry top coats).
Glitter removal isn’t normal polish removal

The most common complaint I hear from both nail newbies and people who have loved polish for decades: “Glitter polish is so pretty, but such a pain to remove!” Where there’s a will to wear pretty indie polishes, there’s a bunch of bloggers working out ways of taking them off without damaging the nail (because then you can wear more polish).
The two most popular glitter removal methods:
1: Foil removal method
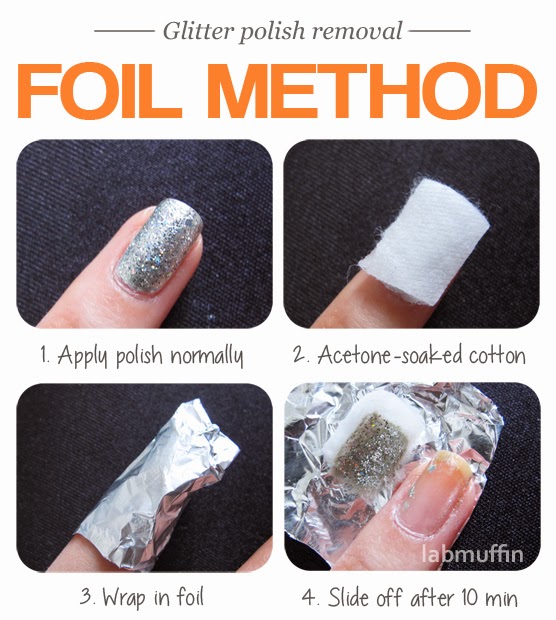
This requires no extra preparation when you’re putting on the polish, but some extra patience when you’re taking it off. This method involves cutting up little pieces of cotton pad to just fit on your nails, dipping them in acetone or other remover, placing them on your nails and wrapping each finger in a cocoon of foil. After 10 minutes or so, you can slide the foil and cotton wool off the nail and most of the glitter with it (you can repeat if needed, or just use the non-glittery side of the cotton to wipe off the leftovers).
2: PVA base method
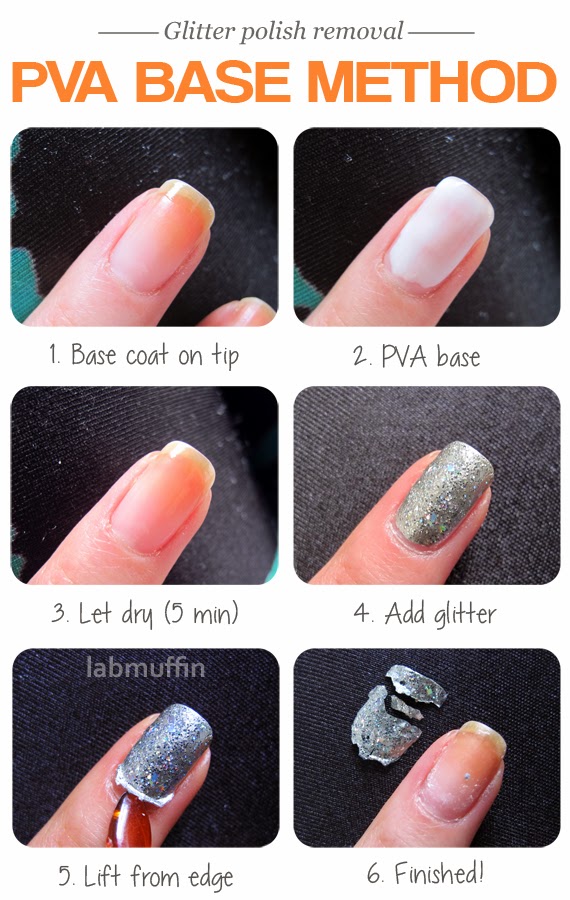
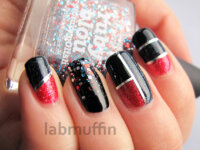
This requires a bit of preparation when you’re applying the polish, but removal is possibly even easier than regular polish removal. You add a coat of what’s essentially diluted PVA glue as the very bottom layer of your manicure, and when it’s time for removal, you simply peel off the whole manicure (I’ve found that it’s easier straight after a shower, because the glue dissolves a bit in hot water, though this runs the risk of damaging fragile wet nails). I add a French tip of base coat under the PVA base to prevent premature peeling, as shown in the image above. You can see a demonstration by Pretty Purple Polish here, and some extra info on troubleshooting PVA removal here.
Other methods include these creepy “adult toy”-looking jars with scrubby rubber flaps (efficient but can be harsh on your skin), picking it off (massive damage, and you walk around with ugly nails for a while), and accidentally putting too much Seche Vite on your nails and having them fall off like beetle shells (effortless and non-damaging but unpredictable and usually unintentional).
Glitter in polish isn’t normal glitter
So you’ve spotted an amazing glitter in a craft store – how do you get that sweet business onto your nails?
Well, sadly, the answer isn’t to dump it into clear polish and hope for the best. Unfortunately, the solvents in nail polish love dissolving the sorts of things glitters are commonly made of, like plastic and paint. What you need are solvent stable glitters. These are tricky to find, and quality indie makers will test glitter stability for months before they even think about selling them. Common issues are when the colour comes off into the base or changes over time (aka bleeding glitter, which can sometimes leave interesting stains on your nails), or the glitter shape warps (aka curling or taco glitter, which can sometimes be a good thing that gives the glitter more interesting shine, but is usually just a source of frustration when you can’t get the glitters to stay flat on the nail).
Since this is a lot of work, it’s common for indie makers to guard their glitter sources closely, but some well-known suppliers of solvent-stable glitter are TKB Trading, Beauty World and Glitter Unique. (Note: not all the glitter from these stores are entirely solvent stable, not even if the store claims that it is. If you’re planning to sell glitter polish, you should thoroughly test glitter to avoid future drama; on the other hand, if it’s just for personal use you can do what you want).
 |
| Wipe that drool off your keyboard! Clockwise from top left: Celestial, Cirque, Lynnderella, Gloss ‘n Sparkle |
But what if you love that melty bleedy glitter to bits, absolutely need it on your nails and can’t find a solvent-stable substitute?
Instead of sticking it in a polish, you can do it old-school style – apply a base layer of polish (match it to the glitter if you can), then depending on the size of the glitter, the density you want and how much you have, you can either dip the wet polish into the glitter, or sprinkle glitter on top. To make it last, cover the glitter with top coat (if it bleeds really badly, you can dab on the top coat to minimise streaking).
What have I missed on glitter? Let me know in the comments below!
Tune in for the next installment – how to look after your wallet while hoarding polish (we can’t live on glitter alone, apparently).
Nail Blogger Secrets for Pretty Nails
Part 1: Top coat the mother
Part 2: Prep that base
Part 3: Clean-up is your sneaky BFF

I have found that polishes (glitter too) can be peeled off my nails relatively easy when I put lanolin on my nail before the polish. Just a thin coat of lanolin, hard to ay how thin…I’m experimenting myself. Generally my soft nails don’t peel when removing this! The underside of the polish, which often comes off in one piece, is even, nothing sticking to it.
When the lanoline is too thin, it comes off harder or not really. When its too thick, the polish comes off to easy. Glitter and no glitter polishes.
That’s what i had found on the side of my nail care, because I always put lanolin under the polish.
(And, to stay strange, since I don’t use a base coat anymore, my nails are practically unstained.)
The peeling and splitting is about the same as before my “polishing days”.
I always want to try pva glue one day, but I like the lanolin in the moment, although this is less predictable in coming off.
Glitter sprinkles on polish could maybe sealed with acrylic clear coat before a top coat? Just a thougt. That could stop the bleeding, I think.
I would trynto have the glitters as short as possible innthe wet polish, only mix it directly before use or sprinkle it on.
Frankens are always good for surprises… my “wannabe gold” flake topper turned green from cheeky copper ions :-
Interesting! How does lanolin base go with chipping and tipwear? I think my nails are naturally oily and do something similar – if I’m lucky I can peel off my entire mani with no damage, but PVA is like insurance 😉
And acrylic top coat is a good idea, I think PVA would also work for people without acrylic supplies 🙂
Well, my nails are quite soft, peeling, asymmetric and so I thought lanolin shpuld be useful hair≈nail so hair care could maybe help. Lanolin is natural hair care and I love using it against lots of skin problems, so I massaged it into nails and beds. They are not really much better, but a bit and I think when the polish comes off cleanly, its better then remover.
Tipwear appears anyway with me. One day, often on the second day and if it’sstill wearable on day four it’s a miracle. Sometimes I forget the lanolin and the mani doesn’t keep longer. If there is too much lanolin, things can peel off after an hour or two. But then they’re soft and I glue them back on with polish :o) great when your nails are naturally oily! Does it come off in one piece or in many little ones?
Some people use hair spray as a separating agent. I think ypu could possibly use hair gel or styling foam or such things too. I’ll post the results then on my blog, because I like “mis using” things, think outside the box for using things. (My frankenpolish has now dissolved all the “gold” flakes! How can that be?)
Lanolin is great for hydrating nails, which should help with peeling and keeping the surrounding skin nice, but not really with the soft issue – have you considered trying something with formaldehyde?
The number of pieces changes – I’ve managed to get one piece a few times, and it helps if there are two coats of Seche Vite! I managed to peel off my Pikachu nail from my Pokemon manicure a while back in one piece and his cute little face is floating around in my nail bucket 🙂
I love misusing products too – it’s so much fun when you find a brand new use! Looking forward to seeing the post.
You’re right in calling it “gold” – most “gold leaf” is actually copper or nickel, sometimes coated in paint, which oxidises in many organic solvents and turns into the reacted, ionised form – you can usually tell from the exact shade of green what metal ion it is.
I do love the foil trick! I also accidentally found that when I use the Sally Hansen cuticle balm before I do my polishes, the polish peels off after a day or two of wear. So now I have to use the cuticle balm after I polish.
I found that the Maybelline glitter polishes were the easiest to remove (not that I have that much glitter polishes).
xxx Kat @ Katness
Oil definitely stuffs around with adhesion – I also wipe the nail with acetone before I apply polish, otherwise it’s chip central.
Thank you so much for the mention and link back! I appreciate it!
Another peel off method is the use of Yellow Stopper from Sally Beauty as a base. I’ve been using the big bottle for daily manis since Sept 2012 (tutorial post at my site) and the bottle has a little less than 1/4 left in it. It typically peels up the following day but with some nail polish formulas it will last 2-3 days.
No worries Jen! Thanks for taking the time to compile such an awesome list!!
I’m not so fond of the idea of formaldehyde … well, maybe I try one day… my observation is that my nails seem to hace an asymmetric thickness: one side is thinner and the edge isn’t very stable. This goes with the “lower side”of the asymmetric nail bed… bad cards. There thr polishes come off easy, due to more flexing of the nail, but id doesn’t break anymore, since I polish my nails! :-))
I found that my self made decals/stickers make the polish last much longer… ant they often came off in one piece, you can find some things about that on my blog. I don’t know if the pre-dryed polish from the foil is somehow stronger or what. But its not bad 😛
I did paint for a while (will do again one day) on canvas with acrylics. I made my own paints, natural pigments and others. I used “gold bronze”,a metal pgment which is, as you said, bronze or brass. (Since I had done a long time ago a science year I look into these things) I had done gold … how do you call it … gilding I think? With “artificial/faux” gold leaf. So I know thenstuff a bit, but with acrylics it behaved better :o)
Anyway, what the xxx is that in the polish, that “eats” my wannabe gold? If you like, have a look in my fingertip gallery, I don’t want to post a link here… is that realy just the solvent? And so quickly, in about 10 days? O_o
I really love reading and following your post as I find them extremely informative and interesting. This post is equally informative as well as interesting . Thank you for information you been putting on making your site such an interesting. I gave something for my information. Nail Polish
Beautiful nail work but in several instances I just can not make out the Name of the polish you are modeling. Your photo groupings of 4 have no caption. Group 1, the bottom left, looks like daisies painted on black. Skipping several quads, Group 3, top right, also glitter on black very similar to Sir Didymus from Mckfresh. Would you please reveal brand and version names of what you are wearing in those photoes?
Thanks for your comment, I’ve added brand names and links to the original posts under the quads now!
Don’t see them but I was able to study the logos and cross ref them with your alpha listing of all brands to find they were Sayuri out of Australia and Cirque I believe. Had to get them from Canada and of course Aus. What a fee!
Ohh now i see. I was expecting Full Captions like you have on the steps to remove glitter quad.
Greetings from Colorado! I’m bored to death at work
so I decided to check out your blog on my iphone during lunch
break. I enjoy the info you provide here and can’t wait to take
a look when I get home. I’m amazed at how quick your blog loaded on my cell phone ..
I’m not even using WIFI, just 3G .. Anyways, awesome blog!
I usually dab my chunky glitter polish onto nail with makeup sponge. It will allowed easy and even application without heavy layer 🙂
Oh that’s a great idea!