Lab Muffin Beauty Science

The science of beauty, skincare, makeup and nails

  • Home
  • Science
  • Browse
    • Archives
    • Reviews by Brand
    • Random Post
  • About
    • About Michelle
    • Site Policies
    • Follow
  • Shop
    • Shop
    • Skincare eBook
  • FREE Exfoliation Guide!

DIY Clay Scrub/Semi-Mask

April 16, 2012 By Michelle 7 Comments

Affiliate Disclosure: I receive a small commission for purchases made via affiliate links.

As much as I like what clay does for my face, I never have the patience to do a proper one (and I usually forget I even have clay). My face feels so itchy as it dries, and I hate when I look in the mirror afterwards and see a green ring around my face that I missed.

As a compromise, I use a clay scrub in the shower once a week. If I put it on at the beginning of my shower and wash it off after all the shampooing and shaving hootenanny, it gets 15 minutes without getting itchy, since it stays moist. I mix in ground oatmeal for a gentle scrub (and perhaps a bit of avenanthramide action). It isn’t quite as oil-absorbent as doing a proper mask, but I much prefer it!

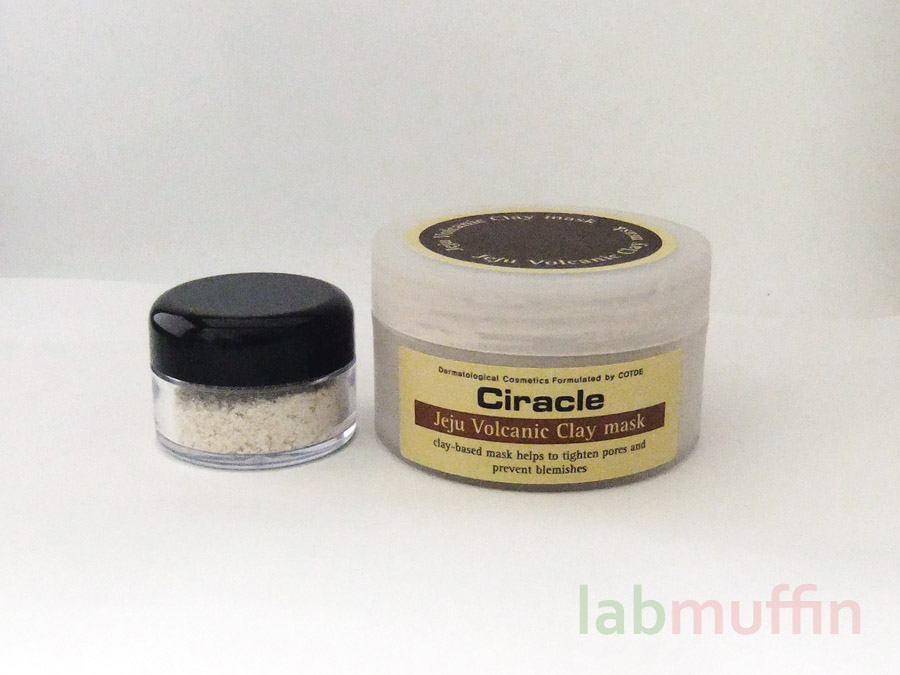
What I use: a Korean volcanic clay mask I bought in Hong Kong, oatmeal blitzed in a coffee grinder, water

Making the scrub

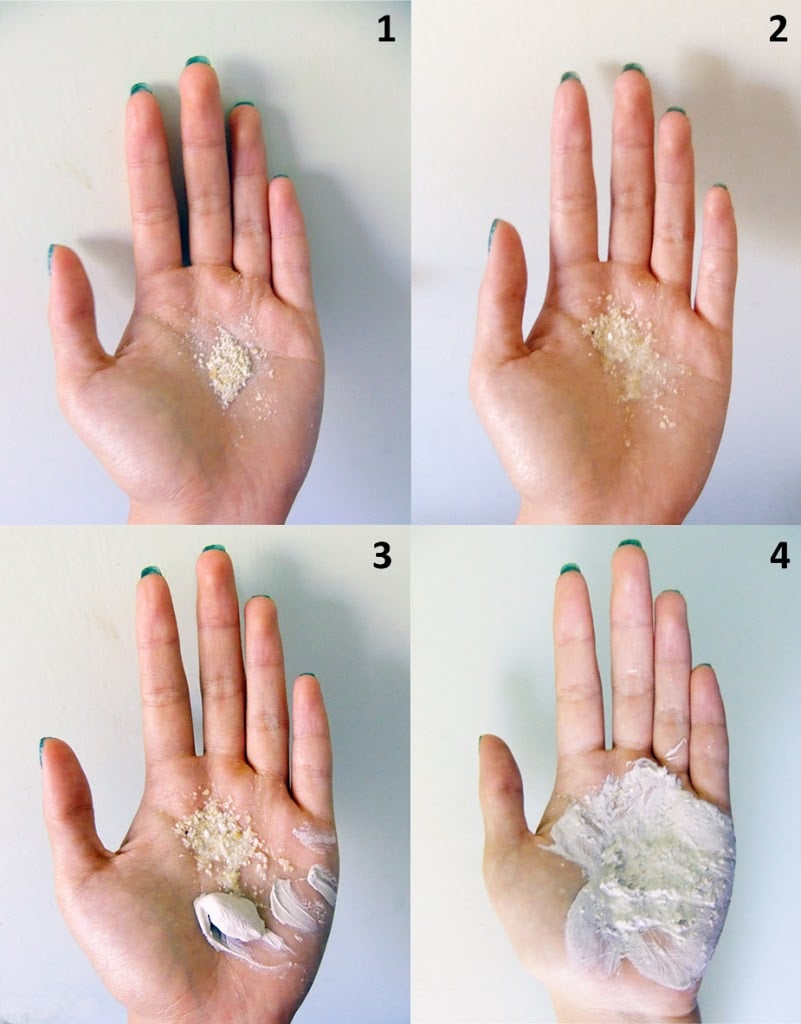
1. Grab a couple pinches of oatmeal.

2. Add water to soften the oatmeal. I just use enough to wet all the oatmeal – you don’t want it too wet, remember that the shower steam is going to wet your mask further!

3. Add clay mask – unfortunately I put too much in the photo here, about half would’ve been enough. Approximately a fingerscoop full (that’s a standard unit of measurement, I swear) should do.

4. Mix in your hand until it’s a kind of pastey texture, adjust proportions if necessary. Mix in a few tiny drops of whatever essential oils your skin likes, if you want. Done!

Using the scrub

1. Rub all over face in gentle circular motion, like you would with a scrub. Don’t scrub your eyes!

2. Make sure your whole face is covered in muddy goodness (except the eyes – using a mirror is handy the first few times), then continue showering as per usual.

3. At the end of your shower, rinse off thoroughly. Depending on your mask, you may need to follow with a cleanser if your face feels mucky.

It’s been working quite well for me so far… let me know how it goes if you try it out! 🙂


Related Posts

  • Easy (5 Minute) DIY Vitamin C Serum Recipe
  • Getting Hair Dye Off Your Hands
  • Breaking Down 5 Minute Crafts “Viral” Beauty Hacks (Video)
  • Body Skincare: Tips, Products & How You Should Shower (with video)

Share this:

  • Facebook
  • Pinterest
  • Twitter
  • Reddit
  • Google
  • More
  • Tumblr

Filed Under: DIY, Skincare, Tutorial Tagged With: cleanser, DIY, mask, natural, scrub, skincare, tutorial

« Mud on your face! Clay for skincare
Q&A: Can Shellac damage your nails? »

Comments

  1. PrettyPurplePolish says

    April 16, 2012 at 11:44 am

    I love your DIY recipes 🙂

    Reply
    • LabMuffin says

      April 16, 2012 at 5:02 pm

      Thanks! 🙂 I love making them, they’re so easy and often work better than things straight out of the bottle!

      Reply
  2. finefingers says

    April 16, 2012 at 5:01 pm

    Totally cool idea! I have s clay mask sitting on my vanity in bathroom which has been there for ages cause I can’t be bothered with the mess (I quite like that feeling as it dries and pulls your face firm). Now I can try it in the shower and who cares the mess you make in there!

    Reply
    • LabMuffin says

      April 18, 2012 at 7:47 pm

      Haha exactly! That’s why I have a massive bottle of olive oil in my shower as well… that stuff gets everywhere!

      Reply
  3. Anonymous says

    May 25, 2012 at 5:05 pm

    where did you buy your clay ?

    Reply

Trackbacks

  1. Review: Lush Angels on Bare Skin - Lab Muffin says:
    January 17, 2015 at 7:35 pm

    […] think I could give this up if I could find some pure glycerin to add to my DIY clay mask… so far I haven’t had any luck with the pharmacies I’ve […]

    Reply
  2. What are microbeads and why should I be concerned about them? - Lab Muffin says:
    November 10, 2015 at 11:03 pm

    […] friendly scrub – add salt, sugar, sand or ground oatmeal to your cleanser (see this DIY face scrub for example!), or use a facecloth or exfoliating brush for non-disposable scrubbing […]

    Reply

Leave a Reply Cancel reply

Your email address will not be published. Required fields are marked *

CommentLuv badgeShow more posts

Facebook Instagram Pinterest Twitter RSS YouTube

Michelle
Hi! I'm Michelle, chemistry PhD and science educator, and I'm here to help you figure out which beauty products are worth buying, and which ones aren't using science!

New Posts Straight to Your Inbox!

https://labmuffin.com/signup-confirmation/

skincare guide skincare guide

Popular Posts

  • My Current Evening Skincare Routine
  • Purging vs Breakouts: When to Ditch Your Skincare
  • How Does Olaplex Hair Treatment Work?
  • Don't Use Lemon Juice on Your Skin
  • Easy (5 Minute) DIY Vitamin C Serum Recipe
  • My Routine for Starting on Tretinoin (Retin-A) Cream

Copyright © 2021 Lab Muffin
 · Foodie Pro Theme On Genesis Framework · Privacy Policy · WordPress · Log in

All rights reserved. No part of this blog may be reproduced or transmitted in any form or by any means without written permission from the author, except for brief quotations when accompanied by a citation and link.

Get Lab Muffin updates (comes with a FREE Essential Guide to Exfoliation!)
Your information will be stored to send you emails. For more information see Privacy Policy.